Many utilities around the world have been discovering abnormal or aberrant P91 base and weld metal microstructures in their plants, leading to, or with a potential to lead to, early cracking and failure in critical plant components. Although it is widely recognized that proper heat treatment is critical in achieving full-strength, high-chromium martensitic steels, it is clear that for various reasons many material suppliers, plant manufacturers, and welding companies have failed to perform this important step, resulting in serious consequences.
Research Is Lacking
Few studies have been carried out on aberrant P91 materials/welds, and the little information available in the public domain tends to suggest that, for certain material conditions, the creep rupture strength level could be as low as that of ASME (The American Society of Mechanical Engineers) P9 steel, or even the Type IV strength of P9 welded joints. Some users have applied the rupture strength of P22 steel for predicting the rupture strength of aberrant P91 steels. However, there is a genuine concern that life prediction based on P9 or P22 steels rupture strength may be overly conservative for many of the aberrant P91 base metal and weld variants.
Although the Electric Power Research Institute is known to have carried out limited and short-term rupture strength studies on aberrant P91, the study entitled “Long Term Rupture Strength of Aberrant P91” is believed to be the first comprehensive and systematic study on more than 30 variants of aberrant P91 base and weld metals of the type frequently found in power plants. This recently started project—aimed at testing base metal and cross weld specimens to test durations of up to 30,000 hours—is currently sponsored by ETD Consulting, GDF Suez (and its subsidiaries Laborelec and Electrabel), and a group of Japanese utilities under the umbrella of the Tokyo-based Central Research Institute of Electric Power Industry. Discussions to gain the involvement of plant manufacturers, such as Alstom, and some U.S. power industry companies are still in progress.
A Variety of Concerns
Typical examples of aberrant P91 base metal variants that plant operators have come across include the following:
■ Material over-tempered (approximately 15C above Ac1—Ac1 is the temperature at which austenite begins to form on heating).
■ Material slightly over-tempered (approximately 10C below Ac1) for longer periods of about 6 hours. Note: Over-tempering can take place at temperatures just below the Ac1 temperature.
■ Material tempered at the bottom of the new ASME allowable range (730C) or the old ASME allowable range (704C).
■ Fully ferritic P91 (too slow cooling from austenitizing).
■ Mixed 30% to 70% ferrite to 70% to 30% martensite (too slow cooling from austenitizing).
■ Lean alloy composition (some or all of the chromium [Cr], molybdenum [Mo], vanadium [V], and niobium [Nb] near lower limits).
■ Soft spots and soft bands found in some piping material.
Examples of aberrant weld metal P91 variants that plant operators have come across include the following:
■ Under-tempered weld metal (<730C).
■ Over-tempered at roughly 10C below Ac1 or 15C above Ac1 (that is, close to Ac1), or slightly higher than the ASME range (775C).
Similarly, various weld repairs and weld repair configurations/geometries, or repeat weld repairs, have also exhibited problems in power plants in Europe, the Middle East, Asia, and North America. Again, in the absence of rupture strength data for these types of joints, plant operators have had difficulty determining how to deal with potentially vulnerable components in their plants.
Other welding problems faced in some of the plants have been low-alloy root runs, which some welding companies have carelessly introduced to avoid the purging needed with high-alloy root runs. These root runs are notoriously difficult to detect.
Plant operators have also come across problems with dissimilar metal welds (both ferritic-to-ferritic and ferritic-to-austenitic). With a range of post-weld heat treatments and no long-term rupture data, little information exists to predict their long-term integrity. Another problem exists when bends are found with no, or inappropriate, post-bend heat treatment. Understanding the integrity and expected behavior of such components is difficult.
An example of how the creep rupture strength of an abnormal P91 material may compare with that of ASME P9 and P91 steels at 600C is shown in Figure 1, while Figure 2 offers an example of how P91 welded component rupture strength may decrease with aberrant material or heat treatment.
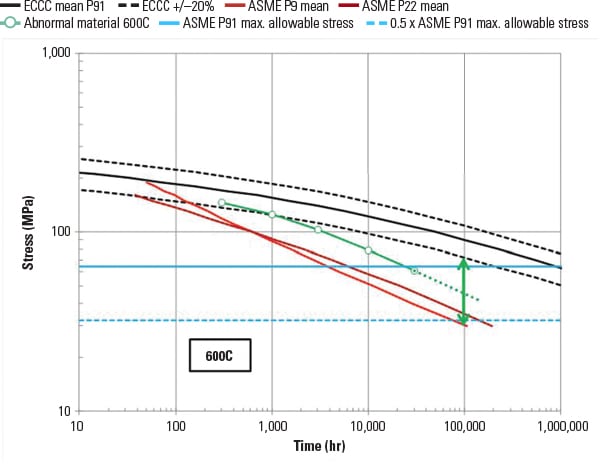 |
| 1. Material comparisons. The graph shows how creep rupture strength of an aberrant P91 material compares with that of ASME P9 and P91 steels at 600C. Source: ETD Consulting |
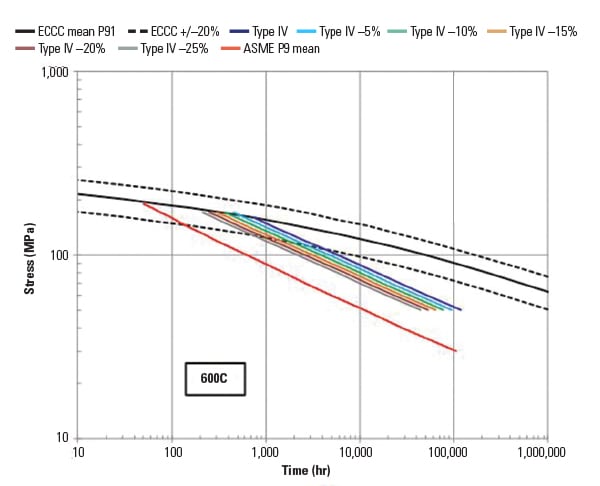 |
| 2. Weld comparisons. The graph shows how cross-weld creep rupture strength of an aberrant P91 material compares with that of ASME P9 and P91 steels at 600C. Source: ETD Consulting |
Taking “Boat Samples”
Recent testing on a weld, joining a low-alloy steam valve body to a P91 reducer pipe in a new coal-fired power plant under construction in Asia, identified a problem but failed to isolate the cause. The P91 component exhibited incorrect microstructure and low-hardness level while the 1CrMoV valve body also exhibited low-hardness level adjacent to the weld. The results of the conventional examination of the P91 reducer indicated that the component may have been incorrectly heat-treated prior to arrival at the site, or it may have been over-heated during the post-weld heat treatment (PWHT) after site welding.
Another possible explanation for the low hardness readings and microstructure abnormality could have been the presence of a thick decarburized layer at the surface of the P91 component. Repeat conventional examination using portable hardness testing and metallographic replication was ruled out because of uncertainties about the depth of the surface decarburized layer and due to limited reliability of measurements made using portable hardness testing equipment. Therefore, it was decided that material samples would be removed from the surfaces of the P91 component for the purpose of microstructural analysis and assessment of hardness under laboratory conditions.
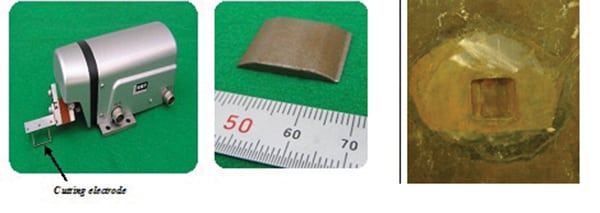
ETD’s electric-discharge sampling equipment (EDSE) was used for this project. The equipment has the capability to remove samples from 1 millimeter (mm) to 20 mm thick from the surface of a component, which means that it is possible to obtain samples in a nondestructive, or minimally invasive, manner (Figure 3).
Using EDSE, weld repair is not necessary, provided that removal of a few millimeters from the surface does not compromise the design minimum wall thickness. The design code wall thickness requirements in this case allowed the removal of 4-mm EDSE samples from the P91 component.
Three samples were removed within about 75 mm of the weld/heat-affected zone. In this way, the sampled material was representative of base material that had been tempered during the at-site PWHT of the weld. Microstructural examination, hardness testing, and micro-hardness testing were carried out on these three samples.
Representative photographic images of the microstructures of each EDSE sample were taken at three locations:
■ Close to the component surface (approximately 0–1 mm depth)
■ Middle of thickness of EDSE sample (approximately 1–3 mm depth)
■ Close to cut-surface of EDSE sample (approximately 3–4 mm depth)
The microstructures of the three P91 samples consisted of a mixture of ferrite and martensite, with relatively coarse carbide particles in some of the ferritic areas. There was no significant change in the microstructure between the component surface and 4-mm depth.
In ETD’s experience, the effect of decarburization at the surface of P91 piping components can extend to 2-mm depth in extreme cases. If the surface of the component is decarburized, then the structure at the surface would contain a high proportion of ferrite and the amount of ferrite would decrease on moving away from the surface. It was thus considered that the mixed ferrite/martensite structure would be representative of the component as a whole.
Abnormally slow cooling (that is, furnace cooling rather than air cooling) from the austenitizing temperature is one possible way in which significant amounts of ferrite could be formed during manufacture. Another possibility arises during PWHT, if the weldment is unintentionally heated above the Ac1 temperature. If this situation occurs, partial re-austenitization of the structure takes place and, if followed by slow cooling to the correct PWHT temperature, then the austenite phase transforms to ferrite/carbide, resulting in a mixed ferrite/carbide and martensite structure.
It thus became essential to either replace the P91 component or remove it from the installation and carry out full reheat treatment (that is, normalizing and tempering) in order to obtain the correct P91 microstructure and normal level of creep rupture strength.
It may be feasible to test miniature test specimens extracted from the EDSE samples for their rupture strength. If this is done, then the data can be used to justify operation of the component for a significant period of time, depending upon the measured strength level and the operating conditions (temperature and stress). In these situations, ETD recommends that the component be monitored closely until it is eventually replaced.
Although the work described above is for a power plant under construction, “boat sampling” is equally useful for assessing the integrity and safe remaining life of critical components in operating power and process plants for all types of metallic/alloy materials.
Nano-Level Creep Detection
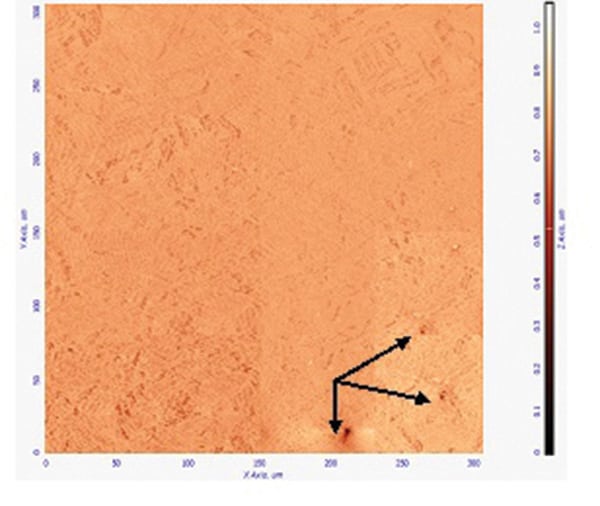
ETD and one of its European industry partners developed another new tool, known as the scanning force microscope (SFM), as part of the now-completed Phase 1 of another joint industry project named “P91/P92 Inspection and Life Assessment.” This portable tool (Figure 4) was specifically developed in an attempt to detect early stage nano-level creep cavitation in P91 and P92 in-service components (Figure 5). Notoriously, damage can go undetected by traditional means (such as replication, or standard ultrasonic testing) in these components until 70% to 80% of their useful life has expired, and failure can occur by fast fracture without much warning.
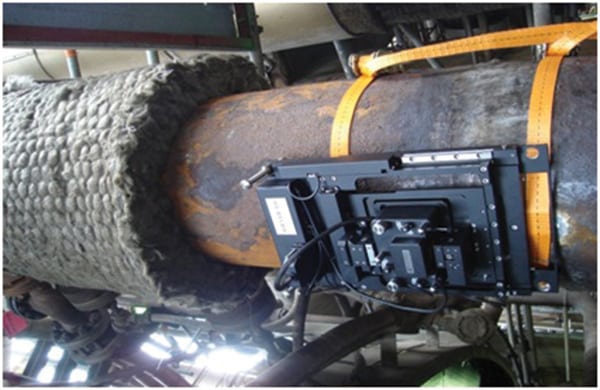 |
| 4. Ready for action. This image, taken at a refinery in Rome, Italy, shows the scanning force microscope, mounted on a pipe, ready to test the low-alloy steel component. Courtesy: ETD Consulting |
The SFM also gives three-dimensional images (Figure 6) and can thus calculate and plot cavity volume, which is a better measure of the component damage. SFM has now been used on two sets of P91 creep-tested specimens (tested at 600C and 625C) where tests were interrupted at 20%, 40%, 60%, and 80% of life, and the cavity volume measured using the SFM was compared to the life fraction consumed. It has also been used successfully on steam valves at an EDF-owned power plant in France, on P91 in-service steam pipes in power plants in the Philippines and Malaysia, and on 1CrMo rotors in Poland.
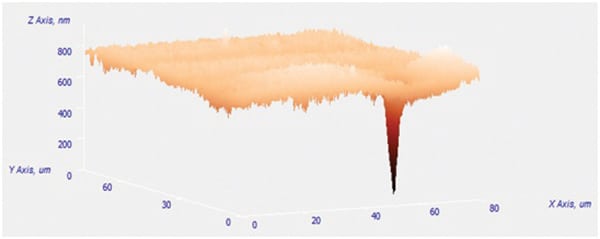 |
| 6. Deep trouble. The three-dimensional image generated by the scanning force microscope shows the depth of a cavity in a P91 pipe. Courtesy: ETD Consulting |
In Phase 2 of the above-mentioned industry-sponsored project, P91 and P92 welded pipes are being tested in Germany at 600C (P91) and 625C (P92) for test durations of up to 10,000 hours, both under creep and creep-fatigue conditions. These tests are being stopped at intervals of 2,000 hours, and SFM—together with other nondestructive examination inspection and monitoring tools, some equally innovative—is being used to relate the creep cavity damage observed with the remaining life of these pipes.
Several problems are faced at high-temperature plants containing P91 components worldwide. Aberrant or abnormal P91 material and welds are frequently found to have been caused by improper heat treatment, which was not carried out with the critical accuracy required for this generation of martensitic steels. Although new tools can help to inspect and quality check some of the aberrant material components, some others, such as those with wrong root runs, may be difficult to identify, thus leaving the risk unknown and unmanaged.
Even components that can be identified to be at risk are creating issues for plant owners and integrity assessors in view of the unknown long-term rupture strength of the aberrant steels. This emphasizes the need for the generation and interpretation of data to help evaluate the safe operating life of plant components. ■
—Dr. Ahmed Shibli (ashibli@etd -consulting.com) is managing director and is lead metallurgist for ETD Consulting.
https://www.powermag.com/inspecting-aberrant-p91-components-for-integrity/?pagenum=2
